You are here: 1. Distribution System > 1.4. SALES Menu: Sales Order Processing > 1.4.11. Sales - Reprint with Range (v2.8)

Sales - Reprint with Range (v2.8)

You use this option to either:

The format in which the invoices and credit notes are printed depends on the format selected in the Reprint Range Format field in the Debtor master file – see "File - Debtor - Formats". If the selected format is PDF or email, Micronet can also consolidate all invoices and credit notes into a single PDF file.


Technical Tip

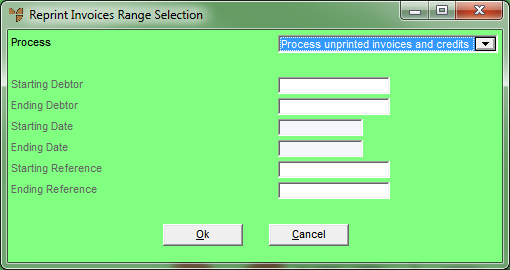
  • If a debtor does not have a Reprint Range Format set in the Debtor master file, Micronet will use the standard default invoice reprint format, e.g. as set in the Debtor master file or in company configuration.
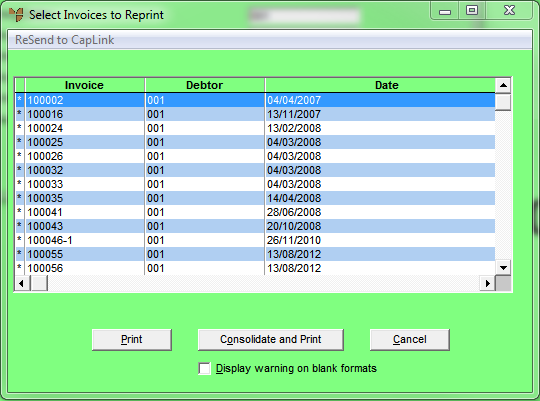
  • If you are emailing the invoices or credit notes and you want to change the email details, e.g. subject or return address, please contact the Micronet Service Desk.

To print a range of invoices and credit notes:

  1. Select SALES | REPRINT WITH RANGE.

Micronet displays the Reprint Invoices Range Selection screen.

  1. Complete the following fields:


Field

Value


Process

Select the action you want to perform:

  • Process unprinted invoices and credits – print all invoices or credit notes that have been processed since the last time this option was run
  • Reprint Invoices and Credits – reprint invoices and credit notes for a range of debtors, dates and/or reference numbers.


Starting / Ending Debtor

To reprint invoices and credit notes for specific debtors, enter the IDs of the first and last debtors. You can also press spacebar then Enter to select debtors. Leave these fields blank to include all debtors.


Starting / Ending Date

To reprint invoices and credit notes for specific dates, enter or select the first and last dates for the invoices and credit notes you want to reprint. Leave these fields blank to include invoices and credit notes for all dates.


Starting / Ending Reference

To reprint specific invoices and credit notes, enter the starting and ending reference numbers. This refers to the reference number for the transaction, e.g. the invoice or credit note number. Leave these fields blank to include all reference numbers.
  1. Select the Ok button.

Micronet displays the Select Invoices to Reprint screen showing all the selected invoices and credit notes. If you entered a range, it displays all invoices and credit notes in the selected range.

  1. Scroll through the range of invoices and credit notes and remove any you don't want reprinted by double clicking on them.

Micronet removes the asterisk beside those entries. It only reprints the invoices and credit notes marked with an asterisk.

  1. If you want a warning displayed when the debtor on an invoice or credit note does not have a format selected for invoices and/or credit notes, tick the Display warning on blank formats box.

This refers to the Reprint Range Format field for invoices and credit notes in the Debtor master file – see "File - Debtor - Formats".


Warning

Be aware that if you tick this option, Micronet will display a message every time it tries to print an invoice / credit note in the batch where the debtor does not have a Reprint Range Format selected. This means you need to be watching the screen to select whether to cancel or continue.

If you leave this option unticked and a debtor does not have a format selected, the invoice / credit note will not be printed.

  1. Select one of the following buttons:

Micronet prints or reprints the selected invoices and credit notes then redisplays the Reprint Invoices Range Selection screen.


Technical Tip

2.8 Feature

The ReSend to CapLink option on the menu bar only applies to companies that use the CapLink payment gateway to handle invoice payments from members of the Capricorn Society, a cooperative of businesses within the Australian automotive industry. Use this option to resend the selected invoices/credit notes to CapLink, instead of using the Print or Consolidate and Print options.

See also: